Friday, September 16, 2011

All Grain Brewing


I have officially upgraded my brewery. That black burner puts out over 210,000 BTU's! A small upgrade from the old gas stove...


So here is the new set up. My three tier system now consist of ladders, saw horses and the ground. 180 degree water flows out of the bucket on the top level to the mash tun (pictured below full of grains) then the wort (sugar water) flows out of the mash tun into a collection pot (two pictures down).  


The 180 degree water goes into this apparatus called a sparge arm. It sprinkles the water into the mash tun so it does not disturb the grain bed.  


When the water makes it all the way through the mash tun it flows into this collection pot. This process is called the "sparge". During the sparge you slowly let the wort out of the mash tun until you get a clear stream without debris. 


You then put all the wort into this large aluminum brew kettle. We usually get about 6 1/2 - 7 gallons of wort. 


This is Master Brewer and friend Nissen checking the specific gravity of the wort before the boil. In this application specific gravity is a measure of sugar suspended in solution. 


Now its time to put this awesome burner to the test. It use to take us over an hour to bring the wort to boil. With the new burner I believe we had a rolling boil in 25 minutes!


It is very important to cool the wort down to around 75 degrees from boiling as fast as you can. Those two copper tubes sticking out of the kettle are part of a heat exchanger called a wort chiller. It is pictured in the second image. Cold water goes in from a hose and hot water flows out into the bucket next to the kettle.


Once the wort is cooled down it is "racked" (transfered) to a "carboy" (large glass fermentation vessel) using an auto-siphon. After the carboy is filled you need to aerate the wort. We use a large plastic spoon handle to mix air into the wort. Once it is properly aerated we inoculate the wort with our yeast culture and put an airlock on the carboy. It is then stored in a cool dark place for three weeks. I racked this particular beer straight into a keg and was drinking it before it was a month old!   

Saturday, September 3, 2011

Squash vine borers!


Two months ago was the first time I had ever heard of anything called
a squash vine borer, so when I walked outside one afternoon to see
these drooping leaves I had no idea what could possibly be going on.
It took about an hour for me to figure it out, though the signs were more
than obvious. 5 plants had been invaded. The vines looked corroded and
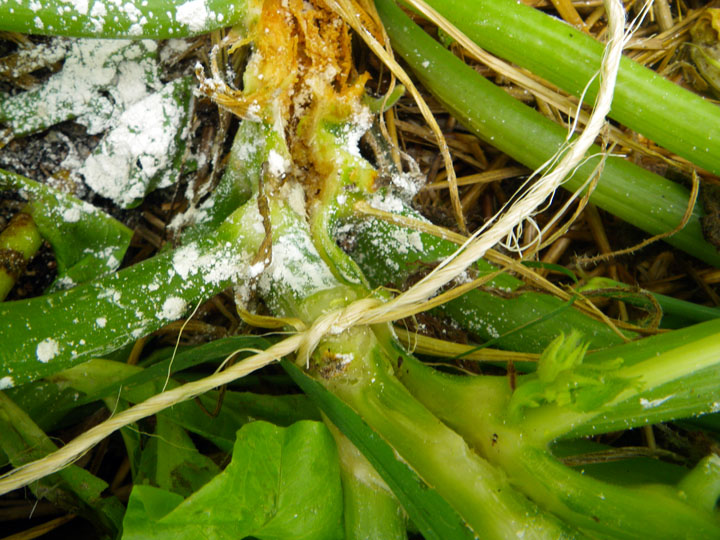
had the "sawdust" appearance. The worms had burrowed a foot and a
half into our largest squash vine, splitting it open at the base.

My understanding is that not much can be done if you are an organic gardener.
So the first thing I did was plant 6 new squash plants elsewhere in the yard.
Then I defiantly set to work trying to help the infected plants. I slit the plants
open with a razor from the base up to where the plant was nice and healthy.

And that's where I found these guys. Now I knew without a doubt we had
borers!! Sorry there's no picture of them in the plant. I was so angry I just
flipped them out before I thought to take one. Then I smashed them.

I tied the vine back together where I cut it open because that
seemed like the thing to do. I read that you need to get the plant
to root above the damage and so I thought it would help if I could
keep the damaged part functional long enough for the rooting to
take place. After I tied it up I buried the section above in soil.


The last thing I did was sprinkle diatomaceous earth on the damaged
parts. I saw smaller brown larve looking things in the vine and I
didn't want to take any chances. I have never heard of putting DE in a
plant but we've had no problems. In fact, it's been 2 weeks since
this all happened and there's new growth on this squash plant. It
has also maintained fruit production. So far we haven't lost any plants.


Sunday, August 7, 2011

Walk around the garden


Asparagus!!! This plant is awesome to grow. I want to eat it now, the wait is killing me.
Sunflowers are great. We lost two but I planted some red ones from my friend Doug and
those just recenly started blooming. Smaller heads but much larger stalks.
Thanks, Doug!!


Here's a shot of the entire raised bed garden from the back of the yard.


The strip of plants centered in this photo are the beginnings of my
"beneficial insect habitat." I will post more about that later.


The potato box... in desperate need of more straw
and it's (now giant) companion horseradish.


Little yummy tomatoes!!! Patrick picked all the flowers off the plants
so they would grow taller so I am still waiting to try my tomatoes. He
doesn't mind because he thinks tomatoes are gross and won't eat them.


Our black-eyed peas. I really love this plant. It's very interesting.
You can just let the beans dry out on the plant and then harvest... so easy.


I am still amazed at how fast these things grow.
I think these are the costata zucchinis — you just cooked them with the flower.


All the squash in the front box is yellow, crook and straightneck.
The cabbage didn't form before it started getting really hot and now it's under
attack from flea beetles. Some of the squash leaves are showing signs of mildew.


Here are a couple protection plants. The leafy one in the background is
wormwood.I scattered it around the Cabbages hoping it would help deter the
beetles. I read somewhere that might help but from what I understand
wormwood is a better animal deterrent.


Lettuce and amaranth. Even though these lettuce varieties are growing
well through the heat they are still a bit bitter. The amaranth greens are
slightly bitter too but not enough to keep us from eating them.
This plant is very nutritious and is doing extremely well in the heat.
I love cooked greens with squash so I find this and lambs quarter are a
great substitute as the chard and kale dwindle in the drought.


I have never grown a sunflower. I am very excited about something
so small growing up to be this big and being able to provide so
much protein. I suppose the whole stalk will dry out and then I can
harvest the seeds. Hopefully it will be as easy as the black-eyed peas.


We don't even know what this is.... Patrick planted a whole bunch of
stuff and can't remember where. Oh well, some kind of squash I'm
guessing! I think it must be acorn or pumpkin. One might be a watermelon.


These are the first carrots we planted. One thing about carrots:
you have to keep planting them. I always forget.


The beginning of the hops wall! We may actually harvest a bit
this year. They are producing a lot already. We replanted the
grape that died and Patrick started training everything on the wires.


We planted some things right outside the compost pile. The vine
in front is a watermelon, I believe. And then okra and another squash plant.


Okra flower.


Here's the other back corner where we have the baby hazelnut hedge.
In the far back are the roses and a big watermelon patch. That must be a
wild grape on the fence. All those tall flowers are queen anne's lace
we left there for the hell of it. The patch now houses dozens of praying mantis =D


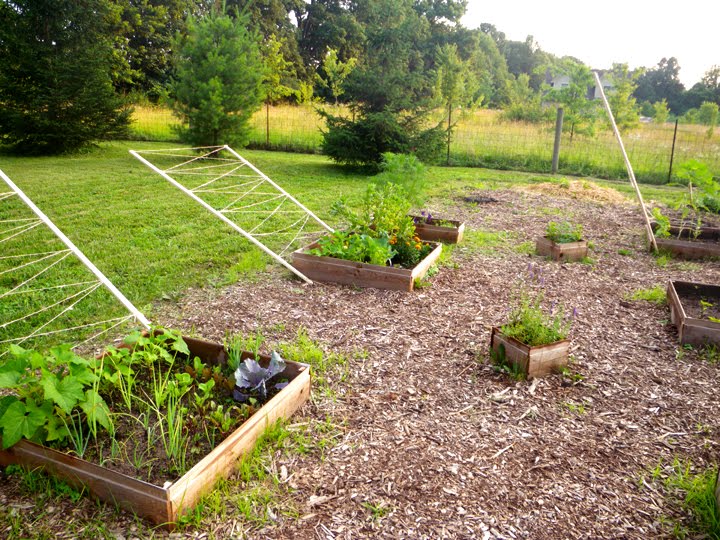
This is just a picture of the raised beds from the side to give
a better perspective of the yard. We have a 1/2 an acre but
the plants are really not taking up that much space. The plan
is to put in a pond where I am standing.

Friday, July 22, 2011

4x4 Arbor Post


Three feet doesn't sound like that far to dig. After a couple minutes with a manual post hole digger it seems almost impossible to dig that far. I put about three inches of pea gravel at the bottom of the hole for the 4x4 to sit on.


I used pressure treated 4x4's from the big box store. After many hours researching online the best way to install 4x4's, I realized where the saying "ask 9 people how to do something and you will get 10 answers", came from. In the end I decided if these only last me 10 years I will be happy.


I used whatever wood I had laying around to support the post while I poured the cement. I poured the cement right out of the bags into the holes. I soaked the cement with water afterward. I have heard you don't even need to do that. You can just let the ambient soil moisture harden the cement.


Here are the post for the hops. They are 12 feet long, standing 9 feet tall. The Grape posts are 8 feet long standing about 5 1/2 tall and the kiwi post are 6 feet long standing about 4 feet tall.


This set up worked quite well. You can do almost anything with ratchet straps.


You have to feed and listen to this level. Its worth it though.


So here we are. I will post later about what I use for wire and how I plan on training the grape (middle posts) and kiwi (front posts) vines.


The hops will wind there way up the hemp I am stringing here. Next year at this time there will be a wall of hops where I am standing.


Wednesday, July 20, 2011

My garden helper...


She is so cute... I can't really be angry with her.
This was, however, my ditch effort at getting some
tasty garden fresh peas during this hot weather.
I guess Guen doesn't think I should eat out of season.

Sunday, July 17, 2011

Trellising


Patrick built trellises for the squash that we can mow
under but they will give slightly once the weight of the fruit is on them.


Zucchini.
One of the cosmos in the back bed was destroyed in a recent storm.
So far We've lost 2 sunflowers (from a prancing deer),
one squash at transplant and this. Pretty good so far.
I probably shouldn't have written any of that... I probably just
cursed my garden... ummm... knock on wood?


Mmmmm, peas! It's too hot for these now but omg, so delicious.
I miss them already :(


A trellis for this itty-bitty tomato.


And then a trellis for the real tomatoes


Here's the whole garden, well the whole raised bed garden and
everything we've trellised. In the pots are the lemon and orange
trees we moved off the deck and then we planted a lot of lettuce. It may
need to move inside. I thought it would be ok still but it's getting bitter.

Thursday, July 7, 2011

Roof Repair


So have you ever seen a couple shingles laying in your yard after a big wind storm?
You get up on the roof and say "Oh, I can fix that".
This is what happens when you start peeling back the shingles...


The old ply-wood was completely rotted through, I used my hands to rip it up.
I thought it was just a small section that was rotted.
When I was done I had to replace two 4x8 foot sections.


I learned 75 percent of what I needed to know on the internet.
The other 25 percent was trial and error. But we can't forget blatant stupidity.
I managed to get three bundles of shingles up the ladder when I realized
I had the wrong color. Back to the big-box-store I went, shingles are very heavy...


Dara's home-made smoothies...


...make thirsty nerds happy.


Back to work. Once you get your rows started, roofing is pretty easy.
Dont get me wrong, roofing is hard work, but most of that comes from lifting heavy
stuff and the heat. Roofers should get paid at least $50 a hour.


So here we are. New roof! I had to replace the top 8 feet of the loft area,
including doing the ridge shingles and the top row of shingles on the other side.


All totaled: one person, 12 hours, half a tube of sunscreen and $175.00 in materials.