Wednesday, May 23, 2012

Bee Update


So first of all, three days after I put my bees in the hives one colony decided they didn't like my handy work and took off. So I am down to one hive but they are doing very well!


This is the first bar they drew for brood. I find it so amazing how they work so fast, when I sit down in front of the hive I see hundreds of bees go in and out in a few minutes. They are very docile. I have only been stung once and that was because while I was watering my newly sown squash seeds, I must have angered a bee I didn't see, stung me in the neck. 


So this is the other side of the hive. They are up to 6-7 bars now, mostly brood I think. I will start adding on honey bars soon. I will not take any honey this year. If there is enough next spring flow I may take a little. I want to make sure they make it strong through the winter.


This is the sugar / water mixture I am feeding them on the recommendation of the man I bought the bees from. I drilled a whole in the bottom of my follower board to let them access the mixture. I will let them finish this off and I will stop feeding them. Hopefully I will never have to do this again. I will put back honey stores for them in the future in case of an emergency. If all goes well I will split the hive next spring and raise a queen to populate my other hive. 


Tuesday, May 15, 2012

Green Quiche

So, I just think this is the best thing I've ever made and I had to share. Since we've started Paleo we haven't been able to eat crust. I was driving home from work with an awful craving for quiche (odd, right?) and I was frustrated because it's just not the same without crust! I've made those little egg muffins but the egg is stiff on the edges... anyway, I was struck with this amazing idea. Plantain crust!!!

The best part about this recipe is that because the crust took so long I just put the rest of the ingredients in the blender and so it became GREEN QUICHE!! And here it is (hope it works out because I don't measure anything):

A few green plantains
Eggs (7?  also ours vary in size because we buy from a local farm)
Cream cheese (Organic Valley, I think I used half a thing)
Butter (lots)
Bacon (half a package)
Handful of spinach
Seasoning - salt mostly
Anything else you want in your quiche

Fry bacon and set aside. Save some of the bacon fat in the skillet and then add butter.
Slice plantains about an eighth inch thick and fry til golden brown and slightly crisp - let cool.
Put eggs, cream cheese, spinach and everything else in blender and blend until totally mixed.
Line pie plate with a couple layers of plantain chips.
Crumble bacon and anything you don't want pureed over top.
Pour filling in and bake at around 350° until middle is solid and top is lightly browned
Eat.


Sunday, May 13, 2012

Top Bar Bee Hives


So this is how much cedar you need to make two 
top bar hives. Actually I messed up my calculations 
and had to buy a few more boards. =) 


I couldn't find 12 x 1 inch boards so I had to glue 8 x 1 & 4 x 1 
inch boards together to make the sides and ends.


I brought them in over night to dry while clamped.


These are the follower boards. I cut them out of a single board 
I had previously glued together. I used a hand saw because I 
wanted to make sure my cuts were precise. I used a piece
 of wood as a guide so my cuts would be straight. 


Here are the follower boards clamped and glued to a top bar. 
The plans for this hive are free on the internet here. I highly recommend this 
site and the information available on it. 
The forum alone is worth its weight
 in honey.


Here I am screwing the ends to the sides. This is relatively easy 
if you any wood working skills and you follow the suggestion 
of the plan designer by using your follower boards as guides.


My life became much easier once I received my birthday present!
How did she know I wanted this specific portable table saw.
I have a very nice, beautiful and caring fiance who understands 
the value of good machinery at the end of my outstretched arm
 pointing at my soon to be birthday present when 
I drag her to the local box store. =)


The table saw sped up the making of the hives so much. In fact
 I don't think I could have made the top bars the way 
I chose to make them, without it.


To seal the bottom I bought translucent plastic crochet sheets from 
a craft store. You need to make sure whatever you use has small 
enough holes to keep unwanted pests out of your hive. The
 recommendation is something with 8-10 holes to the inch. 


Here are the hives with legs. The front hive has the skeleton of the 
roof, it needs cedar shingles to be complete. The back 
hive has the top bars laying on it after I cut the 
1/8 inch groove in the center of each for wax.  


Here is one of the roofs with the cedar shingles in place. I place
 a plastic sheet over the top of the hive before I put the roof on.
 This water proofs my hive. If you opt to make your roof 
completely water proof you can skip the plastic sheet. 


Here are the top bars. Note the center of each bar has
 a 1/8 inch groove cut out. This will be filled with 
wax so the bees can use it as a comb guide.


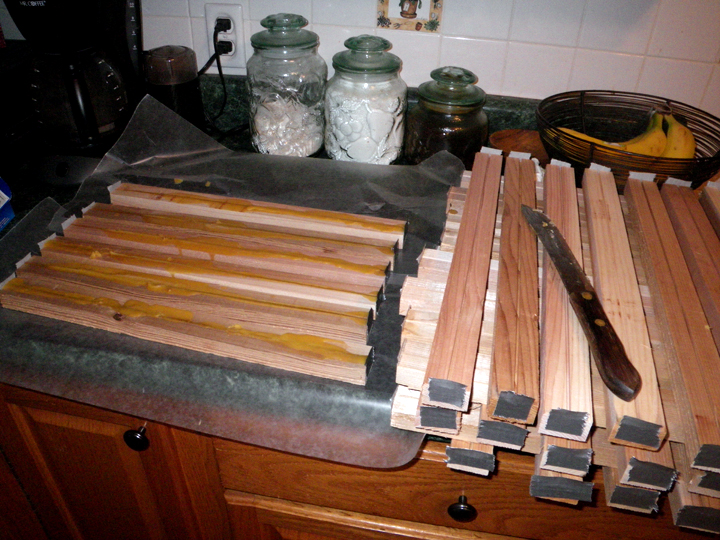
On the left are freshly filled top bars. The bars on the right
 have been cleaned up so only the wax in the center
 is left. Note because I cut the groove straight through 
the top bars some sort of stop needs to be used to
 keep the wax from spilling out of the ends when
 you pour the wax. I opted for duct tape, of course. =)


This is what 10,000 bees look like. The queen is in the 
center in a segregated box so the newly acquainted 
worker and drone bees don't kill her right away.
It is interesting that in a couple days the queen 
bees pheromones will convert the ravenous
 queen-blood thirsty bees into a complacent hive
 ready to defend the her to the death. 


Here I am shaking the bees out of their holding cell 
and into their new home. I did not get stung on 
hiving day, although I had a bee crawl up my 
leg because I forgot to tuck my pants into my socks. 
Luckily it was a drone and couldn't sting me. =)


So here is the finished project. Every piece of wood on the
 hive is cedar even the legs. You could make a hive 
much cheaper than I did, but I personally did not 
want to use pressure treated or chemically
 painted wood for my hives. 

Thursday, April 5, 2012

Pony Poop


So we received a couple packages in the mail for someone with
 the same address as us except for the town, next town over. 
I took the packages to the other house, which isn't far 
from our house, and on the way I saw a sign for "free manure".
 Well if you know me you can guess how long it took until 
my truck bed was full of poop. The farm I got it from have a
 couple pony's. They spread hay and saw dust on the floor
 and pile the manure mix next to their barn. See it
 pays to do something good once in a while.

Wednesday, April 4, 2012

Carrots, the over-wintered kind


Dara was weeding the raised beds yesterday for the upcoming 
spring planting and came across some carrots that made it 
through the winter. All three varieties we plant made it through
 our very mild winter this year. If carrots will just sit in
 the ground and wait to be eaten I may plant a ton
 this year, late summer though early fall, and harvest
 throughout the winter. We plan on eating them tonight. 

Friday, March 30, 2012

Odds and Ends

We have been extremely busy with EMT class.
 Dara and I are volunteers with our local 
Fire Dept and we are currently in school for EMT basic. 
It is hard to get anything done between working 40+ hours a week
 and class. We plan on being more active on the blog and 
on the homestead once class is over. 

Here are a few quick things I thought I would share.


Our hops are coming up like crazy!
 I need to get out there to string them up and cut them back soon.


Here is year two on the asparagus patch.
 I am so tempted to eat the few stalks coming up right
 now but I will control myself for the greater 
good of the patch. Next year its on! 


I was at the big box store the other day and found
 cedar fence posts on clearance for .34 each!
 I bought everything they had. This is the second truck load.
 I will post soon on what I plan to do with them, it's not a fence.

Sorry about the bad picture quality. 
These are from my phone and not edited.
 Again we will be more active soon once class is over. 

Sunday, February 5, 2012

Starting seeds indoors with soil cubes


 This is the Soil Cube Tool, designed and sold by 
Clayton Jacobs. ( www.soilcube.com )  
This is a pretty simple design that is practical and
 easy to use. Basically inside the white squares are 
metal plates attached to the bolts. When you push
 down on the handle the plates compress the soil
 medium into cubes and leave a divot for seed
placement. The springs push the handle
 back to the starting position. 


These are the components of the soil medium. The ratio is:
          3 parts peat moss
       2 parts compost
          1 part garden soil
1 part sand 
  1 part perlite
           Add lime if desired
You can also add fertilizer at this point if you wish. 
I would personally use worm castings and some compost tea. 
You can tweak this mixture for making soil cubes 
but I would stick to the ratios and use medium
 similar to the products in the picture. 


I mixed everything together dry in this large "hose" bucket. 
You can get these at your local box store for $4. I then split 
the mix into three buckets so I could make sure it gets mixed 
consistently. Add just enough water to get a thick oatmeal 
consistency. Once the first 1/3 is mixed add more dry soil 
mixture and repeat. I make a lot of this once a year, saves
 time and it doesn't hurt to have extra.


 Press the tool into the mix and press it against the 
side just filling the inside of the tool with the soil mixture. 
Press down on a hard surface, hold for a second then push 
the handle through the tool and the cubes will fall out. 
It takes a bit of practice to get consistent cubes but if you
 mess up just crumble the bad cube back into the mix.


Here is a close up of the cubes when they are done. 
They hold together very well and readily absorb water. 


Here are the same cubes growing tomatos. 
We have 188 cubes started right now. We are growing
 8 types of tomatos, 7 types of peppers, eggplant,
 celery, leeks, 3 types of onions, broccoli, cauliflower, 
brussel sprouts, green cabbage, red cabbage and kohlrabi. 


Place the cubes in a tub like this, it is very 
easy to move them without handeling them. 
You can pour water in the bottom of the tub which 
the cubes will soak up and wick through the cube. 
Don't let them sit in a pool of water, 
use just enough to saturate the cubes.


This is many varieties of lettuce, spinach, cilantro and amaranth. 
They are growing in trays filled with the grow medium. 
You can grow salad greens all year round without 
them bolting or going bitter in the heat.


Here is the whole set up. The lights are full spectrum
 4 foot fluorescents hanging on chains from a stainless
 steel shelving unit. The lights are on a timer set to come
 on at 5am and go off at 9pm. I have heating pads under
 the peppers and tomatos to help them germinate. I use a 
one gallon hand pump pressure sprayer to mist the cubes 
gently so the seeds are not disturbed.