Showing posts with label queen bee. Show all posts

Wednesday, March 12, 2014

Our Last Hive Did Not Make It Through The Extreme Winter


Dara has been very positive about our one remaining hives survival. I kept saying, "I think they are dead" and she kept saying "no way". This is one case where I wish I was wrong. 


I found this small cluster of dead bees in the center of the hive. They did not have the numbers to make it through the brutally cold winter. Bees keep warm in the winter by forming what is called the "winter cluster". The worker bees cluster around the queen in the center of the hive and actually shiver to raise the temperature to around 81 degrees F. Once the queen starts to lay again the bees ramp up the shivering to bring the cluster temperature to around 93 degrees F. This hive did not have the numbers to keep everyone warm.


They did draw out a lot of comb. I will use this comb in swarm traps this spring to attract local honey bees. The last two years I have bought my colonies from a local bee supplier. He drives down to Georgia every spring and brings back hundreds of boxed colonies. I think part of my problem has been buying colonies from down south and expecting them to acclimate to our temperature extremes.

I will be baiting my hives and building 3-4 swarm traps this spring. If I catch bees, I will be a bee keeper this year. If I don't, I guess I get a year off.


At some point the original queen died or left. I found 5-6 queen cells on the comb. I will be making a bunch of mason bee houses this year. They are great pollinators and need no management at all. I hope I catch a couple swarms this spring. One of these days we will enjoy some honey produced on the homestead.


Monday, July 8, 2013

Well I'll Bee


 I opened up my hives for the first time since I installed the new colonies. They both are doing great. In my previous post on bees I mentioned one of the hives was lost. After seeing no activity in the hive for days, I saw bees coming and going a week after I thought they were gone.


I don't know if a new swarm came in and set up shop or if the original queen managed to keep the hive going and I just didn't notice it. The hive in question is the one that had the dead queen in it when I installed them.


 You need to make sure your bees have enough room in the hive or they will go into swarm mentality. In a top bar hive set up you have what are called follower boards. These can be moved left and right in the hive to make the center bigger or smaller. When I opened up the hives they were both almost full of comb.


 The new top bar design I am using this year seems to be way better than the old style. The bees are drawing comb on the triangular edging I added to the bars. I did not see any cross combing. I recommend this style of comb guide over the flat bar with a line of wax in a groove.


 Here are some bees on our oregano flowers. I am not sure if these are our bees but the odds are really good.


This is our wormwood. This picture was taken after Dara gave it a pretty good pruning. This perennial is very hardy and does well in our climate. Wormwood is a insect deterrent and can be used to make a tea that is effective against aphids, caterpillars, flea beetles and moths. Don't use wormwood tea on edible plants.


 One of the best flowers you can plant for bees is Borage. Borage is a continuously flowering plant. The flowers are a beautiful blue and are quite delicious in a salad. 


 Borage is an annual but once you plant it it will come back every year from the seeds it drops. It is a good companion plant for tomatoes. The leaves are edible with a cucumber like flavor. They contain a very small amount of alkaloids that can be harmful in large quantities.


I let a lot of alluim (onion, leeks) plants go to flower throughout the garden. Bees absolutely love the flowers, who am I to argue with bees.


Friday, May 17, 2013

I Am Going To Bee So Happy When I Get Some Honey


I decided to try a different top bar design this year. I found that comb would break off of the flat top bars and read that this method is better. I bought some cove moulding to use as a comb guide and some very small nails. 


I had to drill pilot holes to get through the oak moulding. I rubbed some bees wax on the edge of each piece of moulding. 


This is the damage wax moths can do to wood. These are cedar top bars. I was pulling dead larvae out of the holes when I cleaned them up. 


Thousands of bees on the dining room table. The cats kept coming up to the boxes and sniffing, then running away. These bees were packaged and picked up from Georgia by my local bee supplier in the same day.


No matter how ridiculous you look, always tuck your pants into your socks. I have heard first hand accounts of horrible / hilarious stories relating to bee stings and naughty bits. 


This is when I discovered that the queen that came with this hive was dead. Bummer.


Not sure how long she made it but she looked like she had been dead for a while. You see all that white stuff  on the bottom? That is a sugary substance that the colony will eat away to free the queen.


Luckily my bee supplier always gets extra queens. He gave me a marked queen. Can you tell which one is the queen? This queen has been packaged with worker bees to feed her.


After I got back from my emergency trip to the bee suppliers house I forgot to do something very important. Can you see what is wrong with this image? I am not rocking the stylish jeans tucked into socks look that is popular with the youth these days. Luckily I did not have an incident while I dumped the bees into their new home.


Here I am closing up the hive. For all the good that did me. I will elaborate later.


I am installing the sugar water that came with the colony. I have a hole drilled in the separator board so the bees can leave the main hive area and get food while still in the hive. 


Here I am admiring my work. I made a critical mistake though. The hive that had the healthy queen had been together for days and the colony had enough time to accept the queen. The colony I put the new marked queen into did not care for her to much. I did not put a stopper on the entrance and all of the bees left the hive. I checked them this morning and they were all gone. I don't mind making mistakes I just don't like the ones that are $80 a pop. The other hive is doing well. I hope they make it through the winter so I can possibly split the hive next spring to put in my empty hive. 


Sunday, May 13, 2012

Top Bar Bee Hives


So this is how much cedar you need to make two 
top bar hives. Actually I messed up my calculations 
and had to buy a few more boards. =) 


I couldn't find 12 x 1 inch boards so I had to glue 8 x 1 & 4 x 1 
inch boards together to make the sides and ends.


I brought them in over night to dry while clamped.


These are the follower boards. I cut them out of a single board 
I had previously glued together. I used a hand saw because I 
wanted to make sure my cuts were precise. I used a piece
 of wood as a guide so my cuts would be straight. 


Here are the follower boards clamped and glued to a top bar. 
The plans for this hive are free on the internet here. I highly recommend this 
site and the information available on it. 
The forum alone is worth its weight
 in honey.


Here I am screwing the ends to the sides. This is relatively easy 
if you any wood working skills and you follow the suggestion 
of the plan designer by using your follower boards as guides.


My life became much easier once I received my birthday present!
How did she know I wanted this specific portable table saw.
I have a very nice, beautiful and caring fiance who understands 
the value of good machinery at the end of my outstretched arm
 pointing at my soon to be birthday present when 
I drag her to the local box store. =)


The table saw sped up the making of the hives so much. In fact
 I don't think I could have made the top bars the way 
I chose to make them, without it.


To seal the bottom I bought translucent plastic crochet sheets from 
a craft store. You need to make sure whatever you use has small 
enough holes to keep unwanted pests out of your hive. The
 recommendation is something with 8-10 holes to the inch. 


Here are the hives with legs. The front hive has the skeleton of the 
roof, it needs cedar shingles to be complete. The back 
hive has the top bars laying on it after I cut the 
1/8 inch groove in the center of each for wax.  


Here is one of the roofs with the cedar shingles in place. I place
 a plastic sheet over the top of the hive before I put the roof on.
 This water proofs my hive. If you opt to make your roof 
completely water proof you can skip the plastic sheet. 


Here are the top bars. Note the center of each bar has
 a 1/8 inch groove cut out. This will be filled with 
wax so the bees can use it as a comb guide.


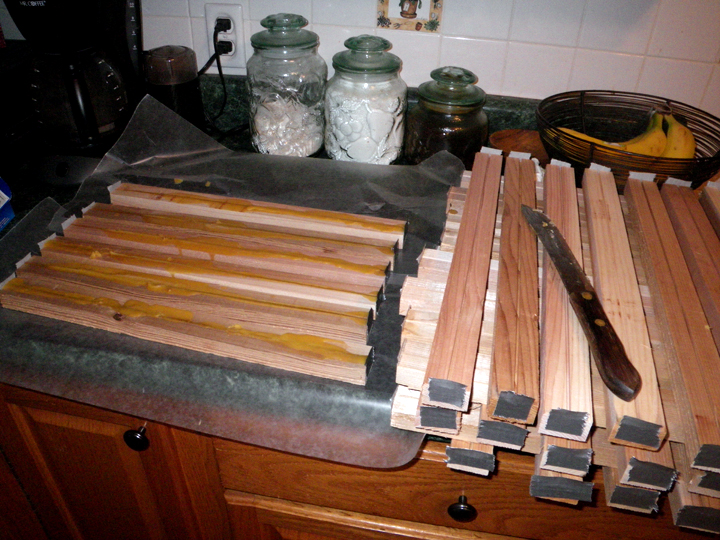
On the left are freshly filled top bars. The bars on the right
 have been cleaned up so only the wax in the center
 is left. Note because I cut the groove straight through 
the top bars some sort of stop needs to be used to
 keep the wax from spilling out of the ends when
 you pour the wax. I opted for duct tape, of course. =)


This is what 10,000 bees look like. The queen is in the 
center in a segregated box so the newly acquainted 
worker and drone bees don't kill her right away.
It is interesting that in a couple days the queen 
bees pheromones will convert the ravenous
 queen-blood thirsty bees into a complacent hive
 ready to defend the her to the death. 


Here I am shaking the bees out of their holding cell 
and into their new home. I did not get stung on 
hiving day, although I had a bee crawl up my 
leg because I forgot to tuck my pants into my socks. 
Luckily it was a drone and couldn't sting me. =)


So here is the finished project. Every piece of wood on the
 hive is cedar even the legs. You could make a hive 
much cheaper than I did, but I personally did not 
want to use pressure treated or chemically
 painted wood for my hives.